SugarCRM Custom Masked Input field
bsoremsugar — March 5, 2010 — 14 Comments
http://developer.sugarcrm.com/2010/03/05/masked-input-field/
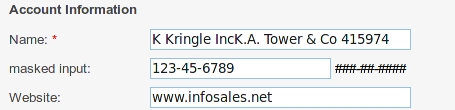
OK, I didn’t mean to publish this last night, I must have accidentally clicked the wrong button somehow. So if you read this before, please catch how it ends. I plan to post several new custom fields in the next few weeks in hopes of sparking some community development of some new custom fields. This post will be showcase the Masked Input field. Masked Input fields allow users to enter formatted data like credit card numbers or phone numbers. They apply a ‘mask’ over the text field and only allow the user to enter the desired characters. For example on a U.S. phone number it would allow 3 number and then automatically enter a dash and then 3 more numbers and so on. It would reject all letter or symbols during input. In my version it looks something like this
This custom field is 100% upgrade safe and it can be added to any module, even custom modules. I will go over all the files needed to make it work and there will be a link to download an installable module that you can simply load into module loader.
This first thing you are going to want to do is read the SugarCRM Developers guide section on SugarField widgets. This will give you an overview of how the stock fields are put together.
So, lets start out going over the files needed to make a custom field.
First the files in the custom/ directory
- custom/Extension/modules/ModuleBuilder/Ext/Language/en_us.Masked_input_field.php
- This file is used to tell SugarCRM of the existence of your new field. The name of the actual file is up to you.
- custom/Extension/modules/EditCustomFields/Ext/Language/en_us.Masked_input_field.php
- This file defines all the language strings for the Studio Editor. The name of the actual file is up to you.
- custom/modules/DynamicFields/templates/Fields/Templatemaskedinput.php
- custom/modules/DynamicFields/templates/Fields/Forms/maskedinput.php
- custom/modules/DynamicFields/templates/Fields/Forms/maskedinput.tpl
- Together these three files draw and handle the ‘Add New Field’ screen in Studio.
Then the files in the include/ directory
- custom/include/SugarFields/Fields/MaskedinputDetailView.tpl
- custom/include/SugarFields/Fields/MaskedinputEditView.tpl
- custom/ include/SugarFields/Fields/MaskedinputSearchView.tpl
- custom/ include/SugarFields/Fields/MaskedinputSugarFieldMaskedinput.js
- custom/ include/SugarFields/Fields/MaskedinputSugarFieldMaskedinputjs.php
- custom/ include/SugarFields/Fields/MaskedinputSugarFieldMaskedinput.php
- custom/ include/SugarFields/Fields/MaskedinputWirelessDetailView.tpl
- custom/ include/SugarFields/Fields/MaskedinputWirelessEditView.tpl
- -These files are responsible for drawing and maintaining the actual field drawn on the EditView or any other view
So we have a collection of files that takes care of the studio side of the custom field and a collection of files that take care of the actual field on the different views. First lets look at the files that take care of the Studio end.
First custom/Extension/modules/ModuleBuilder/Ext/Language/en_us.Masked_input_field.php, this file contains an addition to the $mod_strings['fieldTypes'] array to tell SugarCRM that your new field exists. You should read the Developers Guide in reference to how custom fields need to be named. The other language file custom/Extension/modules/EditCustomFields/Ext/Language/en_us.Masked_input_field.php is the language file that defines the labels and drop downs on the ‘Add new field’ screen. If you created a complex field that actually needed more text than just a label, you would use $app_stings insted of $mod_strings so that your text would be available in all modules.
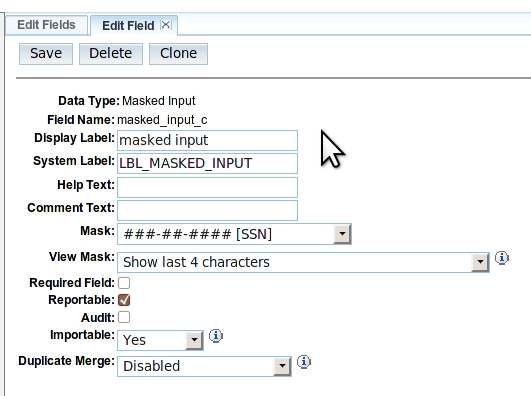
Second are the actual template files, custom/modules/DynamicFields/templates/Fields/Forms/maskedinput.php and custom/modules/DynamicFields/templates/Fields/Forms/maskedinput.tpl actually draws the screen. The maskedinput.tpl file is the smarty template and the PHP file renders it. In the PHP file you can control what fields are shown to the user, for example you can hide the ‘Reportable’ checkbox if the field you are designing doesnt really work on a report. The template file draws the screen in three parts, the tpl file you create for your custom field (maskedinput.tpl in this case) is the middle one with custom/modules/DynamicFields/templates/Fields/Forms/coreTop.tpl on top and custom/modules/DynamicFields/templates/Fields/Forms/coreBottom.tpl on the bottom. You can override either or both of these as well if you want as both are included from within the maskedinput.tpl file. In your “Middle” section you can create as many options for your field as you want. However there are only 4 fields in the database in which to store all your settings. If you look in the fields_meta_data table you will see the fields ext1, ext2, ext3 and ext4. Now ext1, ext2 and ext3 are all text fields but ext4 is a longtext field. Meaning that if you have a long or complex list of options for your custom field what you would want to do is put all those options in an array and serialize it and then place that data in ext4. Something like this.
function save($df) {
global $app_list_strings;
$parent_option=$_REQUEST['options'];
$parent_list=$app_list_strings[$parent_option];
$this->ext1=$_REQUEST['options'];
$ext4=array();
foreach ($parent_list as $key=>$value) {
$ext4[$key]=$_REQUEST[$key.'_child'];
}
$this->ext4=base64_encode(serialize($ext4));
parent::save($df);
}
Third is the custom/modules/DynamicFields/templates/Fields/Templatemaskedinput.php file. This file handles the saving of the “add field” form drawn by the files above, the declaring of the filed type to by used in the database and handles any other custom code you might have. The save() routine above would go in this file.
Now lets looks at the files that will actually draw the field on the EditView, DetailView and SearchView. The ListView is not yet supported yet. The ListView, at the moment, will simply display whatever is in the database.
- custom/include/SugarFields/Fields/MaskedinputDetailView.tpl
- This file controls what the field looks like on the DetailView
- In Masked Input this file controls if all the data is shown or just a subset.
- custom/include/SugarFields/Fields/MaskedinputEditView.tpl
- This file controls what the field looks like on the EditView
- In Masked Input this file actually runs the JavaScript (from MaskedinputSugarFieldMaskedinput.js) to make the Masked Input field.
- custom/ include/SugarFields/Fields/MaskedinputSearchView.tpl
- This file controls what the field looks like on the SearchView
- custom/ include/SugarFields/Fields/MaskedinputSugarFieldMaskedinput.js
- This is a javascript file that I include in the EditView. I include it in the MaskedinputSugarFieldMaskedinput.php so it is only included on the page once no matter how many Masked Input fields are on the screen.
- custom/ include/SugarFields/Fields/MaskedinputSugarFieldMaskedinput.php
- This loads the various TPL in this directory depending on what screen is to be shown.
- custom/ include/SugarFields/Fields/MaskedinputWirelessDetailView.tpl
- This file controls what the field looks like on the WAP DetailView
- This file controls what the field looks like on the WAP DetailView
- custom/ include/SugarFields/Fields/MaskedinputWirelessEditView.tpl
- This file controls what the field looks like on the WAP EditView
I have made my source code available as a loadable module here.